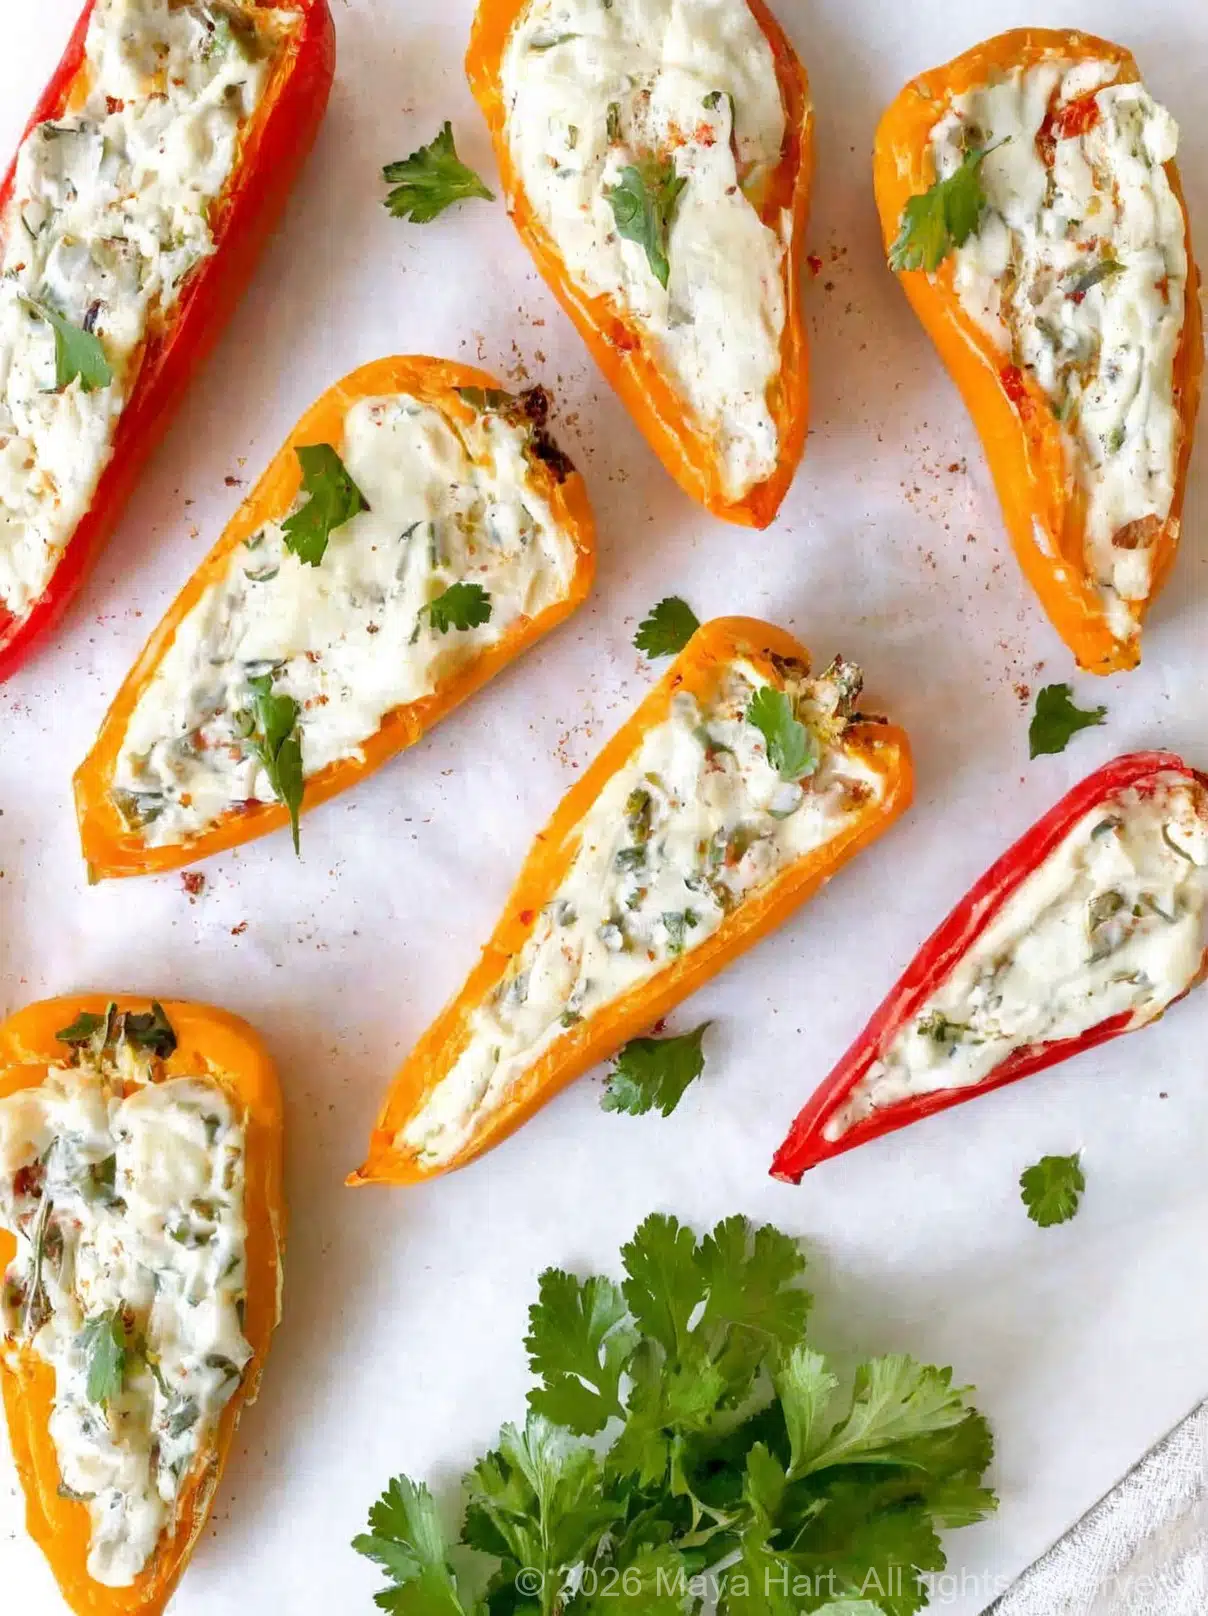
Summary: These herb cream cheese stuffed mini peppers are the bump-friendly, no-spice, all-flavor snack I reached for constantly during both pregnancies. Sweet mini bell peppers are roasted until tender, filled with a garlicky herb cream cheese mixture, and baked until golden and bubbly. They are quick to throw together, endlessly customizable, and perfect for holiday parties, game day, or a solo snack when you need something warm and satisfying that you can eat with one hand. Jump straight to the recipe card.
I discovered the magic of stuffed mini peppers during my second pregnancy, right around the time the holiday season was in full swing and I was too tired to cook anything elaborate, yet I desperately wanted to feel festive. I had a bag of those tiny sweet peppers in the fridge, a half-used block of cream cheese, and a handful of cilantro that was on the verge of wilting. It was the kind of thrown-together kitchen experiment that usually ends in disappointment, but this time it turned into a recipe I have now made more times than I can count. The peppers softened in the oven, the cream cheese got warm and almost fluffy, and the garlic and herbs filled my tiny kitchen with a smell that made my whole body relax. I stood at the counter, bump pressed against the edge, and ate four of them straight off the baking sheet before my toddler even noticed.
Now, these herb cream cheese stuffed mini peppers are my go-to for any gathering where I need to bring something that looks impressive but takes almost no effort. They are also the snack I make for myself on a random Tuesday when I want something warm, creamy, and a little bit special without turning on the stove for more than a few minutes. And because they use pasteurized cream cheese and sweet peppers, they are completely safe for pregnancy, which was something I fact-checked obsessively with my midwife before adding them to my regular rotation.
Why These Stuffed Mini Peppers Are a HomeBumpMeals Hero
When I started building the recipe collection for this site, I had a few non-negotiables. Every dish had to be doable on low energy, packed with real nutrients, and, ideally, possible to eat with one hand while holding a baby or nursing. These little peppers tick every single box. Here is why they have earned a permanent spot in my kitchen, and why I think you will love them as much as I do.
- Pregnancy-safe and pasteurized: Cream cheese sold in grocery stores is made from pasteurized milk and cream, which means it is safe to eat cold or warm during pregnancy. I checked the label on my favorite brand, saw the magic word “pasteurized,” and never looked back.
- Gentle on queasy stomachs: Mini sweet peppers are mild, not spicy, and they have zero heat. The roasting process brings out their natural sweetness, making them easy to eat even when your stomach is feeling iffy. I ate these happily during my first trimester when nearly everything else turned me off.
- Protein and healthy fats: Cream cheese provides a bit of protein and fat that helps keep your blood sugar steady. Pair these with a handful of nuts or a glass of milk, and you have a genuinely satisfying snack that will not spike and crash you an hour later.
- Quick and low-effort: The filling comes together in minutes while the peppers get a quick pre-roast in the oven. The whole dish takes about half an hour from start to finish, and most of that is hands-off baking time.
- Totally customizable: Not a fan of cilantro? Swap it for parsley, chives, basil, or dill. Like more garlic? Double the cloves. Need a little spice? A pinch of Aleppo pepper or smoked paprika on top adds warmth without overwhelming heat. This recipe is a template, not a rulebook.
- One-handed eating: Once baked, these mini peppers are sturdy enough to pick up and eat like a little boat. I have eaten them cold from the fridge while nursing, warm off the baking sheet while chasing a toddler, and at room temperature at a party while balancing a plate and a glass of sparkling water.
The Process: Simple Enough for a Tired Mama
I want to walk you through how these come together, because the first time I made them, I had no idea what I was doing and they still turned out beautifully. There are only a few steps, and none of them require any special equipment or advanced cooking skills.
First, you cut the mini peppers in half lengthwise and scoop out the seeds and ribs. This is the most time-consuming part, and honestly, it takes about five minutes. I usually do it while my toddler is playing in the living room or napping. If you are in a really exhausted season, you can even prep the peppers in the morning and keep them in the fridge until you are ready to bake. Then you sauté a little diced onion and minced garlic in olive oil until softened. The smell of garlic cooking is one of the few things that never triggered my pregnancy nausea, and it makes the whole kitchen smell like someone is making something special.
While the onion and garlic cool slightly, you place the pepper halves on a baking sheet, drizzle them with a tiny bit of olive oil, and pop them in the oven for about eight minutes. This initial roast is important because it softens the peppers so they are tender and sweet by the time the filling is added. Skipping this step leaves you with peppers that are a bit too raw and crunchy.
For the filling, you simply stir together the softened cream cheese, the cooked onion and garlic, a generous handful of chopped cilantro (or your herb of choice), a pinch of salt, and a crack of black pepper. I use a fork to mash and whip everything together. It takes maybe two minutes. Then you spoon the mixture into the pre-roasted pepper halves. Do not worry about making them look perfect. They are meant to be rustic and homemade. Some filling will spill over the sides, and that is exactly right. The little bits that touch the baking sheet get slightly golden and almost crispy, and those are the bites everyone fights over.
The peppers go back into the oven for another ten minutes or so, until the cream cheese is bubbly and just beginning to take on a golden color around the edges. Then out they come, and I usually cannot resist eating at least one immediately, burning my tongue in the process. A sprinkle of sweet paprika and sesame seeds on top makes them look festive, but both are entirely optional.
Pantry Raid Variations and Swaps
I have made these stuffed mini peppers in so many different ways over the years, depending on what was in my fridge and what my pregnancy taste buds could handle. Here are a few of my favorite riffs:
- Herb swap: No cilantro? No problem. Fresh parsley, chives, dill, basil, or even a mix works beautifully. I once made a version with fresh dill and a tiny bit of lemon zest, and it tasted like a fancy tea sandwich in pepper form.
- Garlic adjustment: If you like a stronger garlic kick, use two cloves instead of one. I dialed back the garlic during my first trimester when strong flavors made me queasy, but by the third trimester I was back to my garlic-loving self.
- Add some heat: If you are not sensitive to spice, a pinch of red pepper flakes, Aleppo pepper, or a dusting of smoked paprika adds a warm note without setting your mouth on fire. Sweet paprika is my go-to garnish because it adds color and the gentlest hum of flavor.
- Extra protein: Stir a tablespoon of finely crumbled cooked bacon or prosciutto into the cream cheese mixture. If you are vegetarian, finely chopped toasted walnuts or pine nuts add a lovely crunch and a bit of extra protein and healthy fat.
- Make it dairy-free: I have tested this recipe with a good plant-based cream cheese, and it works. Look for one that is thick and tangy, and expect the filling to be a little softer, but still delicious.
- Mini pepper prep ahead: You can cut and seed the peppers and make the filling up to a day in advance. Keep them separate in the fridge, then assemble and bake right before serving. This is a lifesaver if you are hosting a holiday gathering and want to minimize day-of chaos.
A Quick Note from Our Consulting Dietitian
Each recipe on HomeBumpMeals is reviewed by a registered dietitian for nutritional balance during the childbearing year. For these herb cream cheese stuffed mini peppers, the RD highlighted that sweet mini peppers are a good source of vitamin C, which supports immune health and helps your body absorb iron from other foods. Cream cheese provides some calcium and fat, making the snack satiating. She recommends checking the ingredient label on your cream cheese to ensure it is made from pasteurized milk and does not contain unnecessary additives. For mamas watching sodium, use a low-sodium cream cheese or rinse the onion and garlic mixture briefly after sautéing if you have added salt. Overall, this snack is a great way to sneak in a vegetable while getting a little protein and fat.
Maya’s Mom Confession (The Holiday Party Edition)
I made these stuffed peppers for the first time on Christmas Eve, when I was about 24 weeks pregnant with my second. We were having a few family members over, and I wanted to put out something festive that did not involve me standing in the kitchen for hours. I had a toddler who was very excited about Santa, a bump that made bending over to pick up dropped ornaments feel like an athletic event, and a deep craving for creamy, savory things. I threw the peppers together in the afternoon, popped them in the oven right before guests arrived, and served them on a wooden board with a little bowl of extra paprika on the side. My father-in-law, who is not a big vegetable guy, ate six of them and asked for the recipe. My toddler dipped hers in applesauce and declared them “yummy boats.” I felt like I had pulled off a magic trick.
That is the beauty of these little peppers. They feel special enough for a party but are simple enough for a tired Tuesday. They remind me that feeding myself and the people I love does not have to be complicated. Sometimes it just takes a bag of mini peppers, a block of cream cheese, and a few minutes of quiet roasting while the Christmas lights twinkle and the baby kicks gently from inside.
How to Serve These Cream Cheese Stuffed Mini Peppers
These are incredibly versatile. I have served them warm from the oven as a Thanksgiving appetizer, at room temperature at a Super Bowl party, and cold straight from the fridge the next morning when I needed something to eat with one hand while nursing. Here are a few serving ideas:
- On a festive appetizer board: Arrange them alongside other bump-friendly snacks like my Watermelon Feta Salad, a bowl of mixed olives, and some whole grain crackers.
- As a side dish: These pair beautifully with a simple roast chicken, grilled fish, or a big bowl of soup.
- Meal prep snack: Bake a batch on Sunday, store them in the fridge, and grab a few throughout the week for a quick protein-and-veggie snack. They reheat well in the microwave or toaster oven, though I usually eat them cold.
- Kids’ lunchbox: If your little one is past the puree stage, these mini peppers are a fun, colorful addition to a lunchbox. My toddler calls them “cheese boats” and feels very proud of herself when she eats the whole thing.
Storing and Reheating
Leftover stuffed peppers will keep in the fridge for up to three days in a sealed container. To reheat, pop them in the oven at 350°F for about 5 minutes, or microwave for 30 seconds. The peppers will soften a bit more upon reheating, but they are still delicious. I do not recommend freezing, as the cream cheese texture changes upon thawing.
Ready to make your own batch? The full recipe card, with exact measurements, step-by-step instructions, and all my tested tips, is right below this post. Go grab those mini peppers and let us get stuffing.