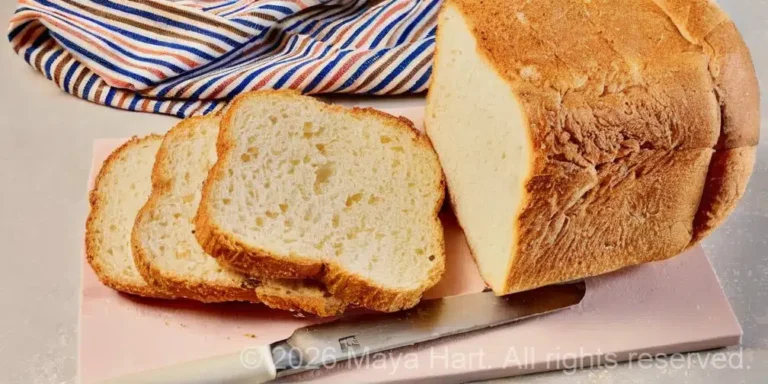
I never thought a bread machine would make me cry happy tears, but here we are. When I was pregnant with my first, someone gifted us a secondhand bread machine. It sat in the back of a cupboard for months because I was sure I would never use it. Then the third trimester hit, and suddenly standing at the counter kneading dough felt like an Olympic sport I had not trained for. I pulled out that machine, found a simple recipe, and pressed Start. The loaf that came out was golden, tall, and smelled like my grandmother’s kitchen. I stood at the counter eating a slice with butter while my belly bumped against the drawer handles, and I felt like I had just won something.
That very recipe, the one I now call our HomeBumpMeals Everyday Bread Machine Loaf, has been my quiet kitchen hero for years. It asks for almost nothing: warm water, a little sugar, yeast, oil, bread flour, and salt. The machine does the heavy lifting while you nap, nurse, or chase a toddler. And the reward is a loaf of bread so soft and flaky that you will swear it came from a bakery, except you made it in your slippers with a baby monitor nearby.
During those early postpartum weeks, this bread kept me going. I would set the machine up during a late night feeding session, and by morning the whole apartment smelled like fresh bread. A thick slice with peanut butter became my one handed breakfast of champions. Later, when my little one started solids, this bread turned into gentle toast fingers for teething gums. It has been the base for countless quick sandwiches, the sidekick to warm soup, and sometimes just a vehicle for an absurd amount of butter at 10 p.m. when I was too tired to cook anything else.
Why This Bread Machine Recipe Works So Well for Mamas
The beauty of this loaf lies in its simplicity. You do not need to know anything about yeast or gluten or kneading. The machine handles all of that. You just measure, add, and press a button. The yeast proofs right in the warm water and sugar while you walk away, and the machine takes it from a shaggy dough to a perfectly risen loaf. The result is a bread with a tender crumb, a flaky crust, and a flavor that is neutral enough for both jam and ham.
For anyone navigating pregnancy nausea, this bread is gentle on the stomach and far more satisfying than crackers. For mamas managing gestational diabetes, a slice of this bread paired with protein and fat can be part of a balanced breakfast that keeps blood sugar steady. And for the postpartum marathon of breastfeeding and sleepless nights, it is a reliable, calorie dense staple that feels like a real meal even when you only have one free hand.
The Tiny Kitchen Lab Notes
I have made this loaf so many times that I could probably do it in my sleep. Over the years I have tested little tweaks and learned a few things worth sharing. The recipe calls for bread flour, which has a higher protein content and gives the loaf its lovely structure. But I have used all purpose flour in a pinch, and while the bread turns out slightly softer, it is still delicious. My consulting dietitian gave a thumbs up to using olive oil instead of vegetable oil for a boost of healthy fats, and I have done that more times than not. She also reminded me that homemade bread lets you control the salt, which is helpful if you are watching sodium during pregnancy.
Maya’s Mom Confession
I will tell you something I have not admitted to many people. The first time I made this bread, I watched the machine the way you watch a sleeping newborn. I kept lifting the lid to peek, convinced something would go wrong. When the beep sounded and I pulled out a perfect, golden dome of bread, I actually hugged the machine. I was exhausted, swollen, and terrified of the gestational diabetes diagnosis that had just landed in my lap. But here was this loaf, warm and real, made with my own two hands and a little help from technology. It tasted like hope.
Now, as a mom of two, the bread machine still sits on the counter. My three year old helps me pour the flour (which mostly ends up on the floor), and she calls it “magic bread” because it rises like a balloon. Some weeks we make a loaf every other day. Other weeks the machine collects dust. But every time I hear that beep and smell that warm, yeasty scent, I am transported back to that first victory in my tiny kitchen. It reminds me that nourishing my family does not require perfection. It just requires showing up and pressing Start.
What to Do with Your Fresh Loaf
One loaf yields about twelve slices, and they go faster than you think. Here are a few of the ways we use this bread at our house:
- Toast with all the toppings: Butter and jam, mashed avocado, a smear of cream cheese, or peanut butter with banana slices. It toasts up beautifully golden and holds its shape.
- Quick breakfast sandwiches: A fried egg and a slice of cheese between two toasted pieces of this bread is a protein packed start to the day that takes under five minutes.
- Grilled cheese for the soul: This bread makes an incredible grilled cheese. The crust gets shatteringly crisp while the inside stays soft and melty.
- French toast: Slightly stale slices of this bread soak up the egg mixture like a dream. I have made French toast with this loaf more mornings than I can count.
- Baby led weaning fingers: Lightly toasted and cut into strips, this bread is perfect for little hands learning to eat solids. Just keep an eye on texture and avoid anything too crusty for early eaters.
A Bread Machine Is Not Cheating
I used to think that using a bread machine was somehow less than baking bread by hand. Then I became a mom, and I realized that anything that gets wholesome food on the table while preserving my sanity is a gift. The machine does the mixing, kneading, rising, and baking. You get the credit and the smell. In a season of life where energy is low and demands are high, that is exactly the kind of shortcut we need.
If you have a bread machine gathering dust in a cupboard, this is your sign to pull it out. If you do not have one, they are easy to find secondhand for very little money. And if you are on the fence about whether you will really use it, let me be the friend who tells you that pressing a button and getting fresh bread is a level of satisfaction that never gets old.
A Few Tips from Many Loaves
- Use warm water, not hot. The sweet spot is around 110 degrees F (45 degrees C). Too hot, and you risk killing the yeast. Too cool, and it will take longer to foam. I use the same temperature as a warm bath for a baby.
- Let the yeast proof. Those ten minutes with water and sugar are what wake up the yeast and ensure a good rise. You should see a foamy layer on top before adding the rest of the ingredients.
- Measure flour correctly. Spoon it into the measuring cup and level it off rather than scooping directly from the bag. Too much flour makes a dense loaf, and too little makes one that sinks in the middle.
- Cool completely before slicing. I know it is tempting to slice into warm bread, but letting it cool on a rack prevents the crumb from getting gummy. Give it at least an hour if you can stand it.
- Store wisely. Homemade bread has no preservatives, so it stales faster than store bought. Keep it in a sealed bag at room temperature for a few days, or slice and freeze for longer storage. It defrosts beautifully in the toaster.
Why This Recipe Earned Its Place on HomeBumpMeals
When I started this site, I made a promise to only share recipes that were truly doable in real life with real kids. This bread machine loaf passes every test. It is affordable, adaptable, and practically hands off. It fills the house with a smell that makes even the hardest mornings feel a little gentler. And it delivers a loaf that tastes like effort and love, even when you had very little of either to give.
Every time I slice into this bread, I think of the mama I was when I first made it, scared and tired and just trying to do something good for my baby. I think of the mama I am now, who still has hard days but knows how to feed herself and her family with a little more confidence. And I hope that when you make this loaf, you feel a little bit of that warmth too. You are doing so much more than baking bread. You are taking care of you, and that matters.
Ready to make your own loaf? The full recipe card, with ingredient amounts, step by step instructions, and all my final tips, is right here. Let your bread machine do the work, and you take the credit.