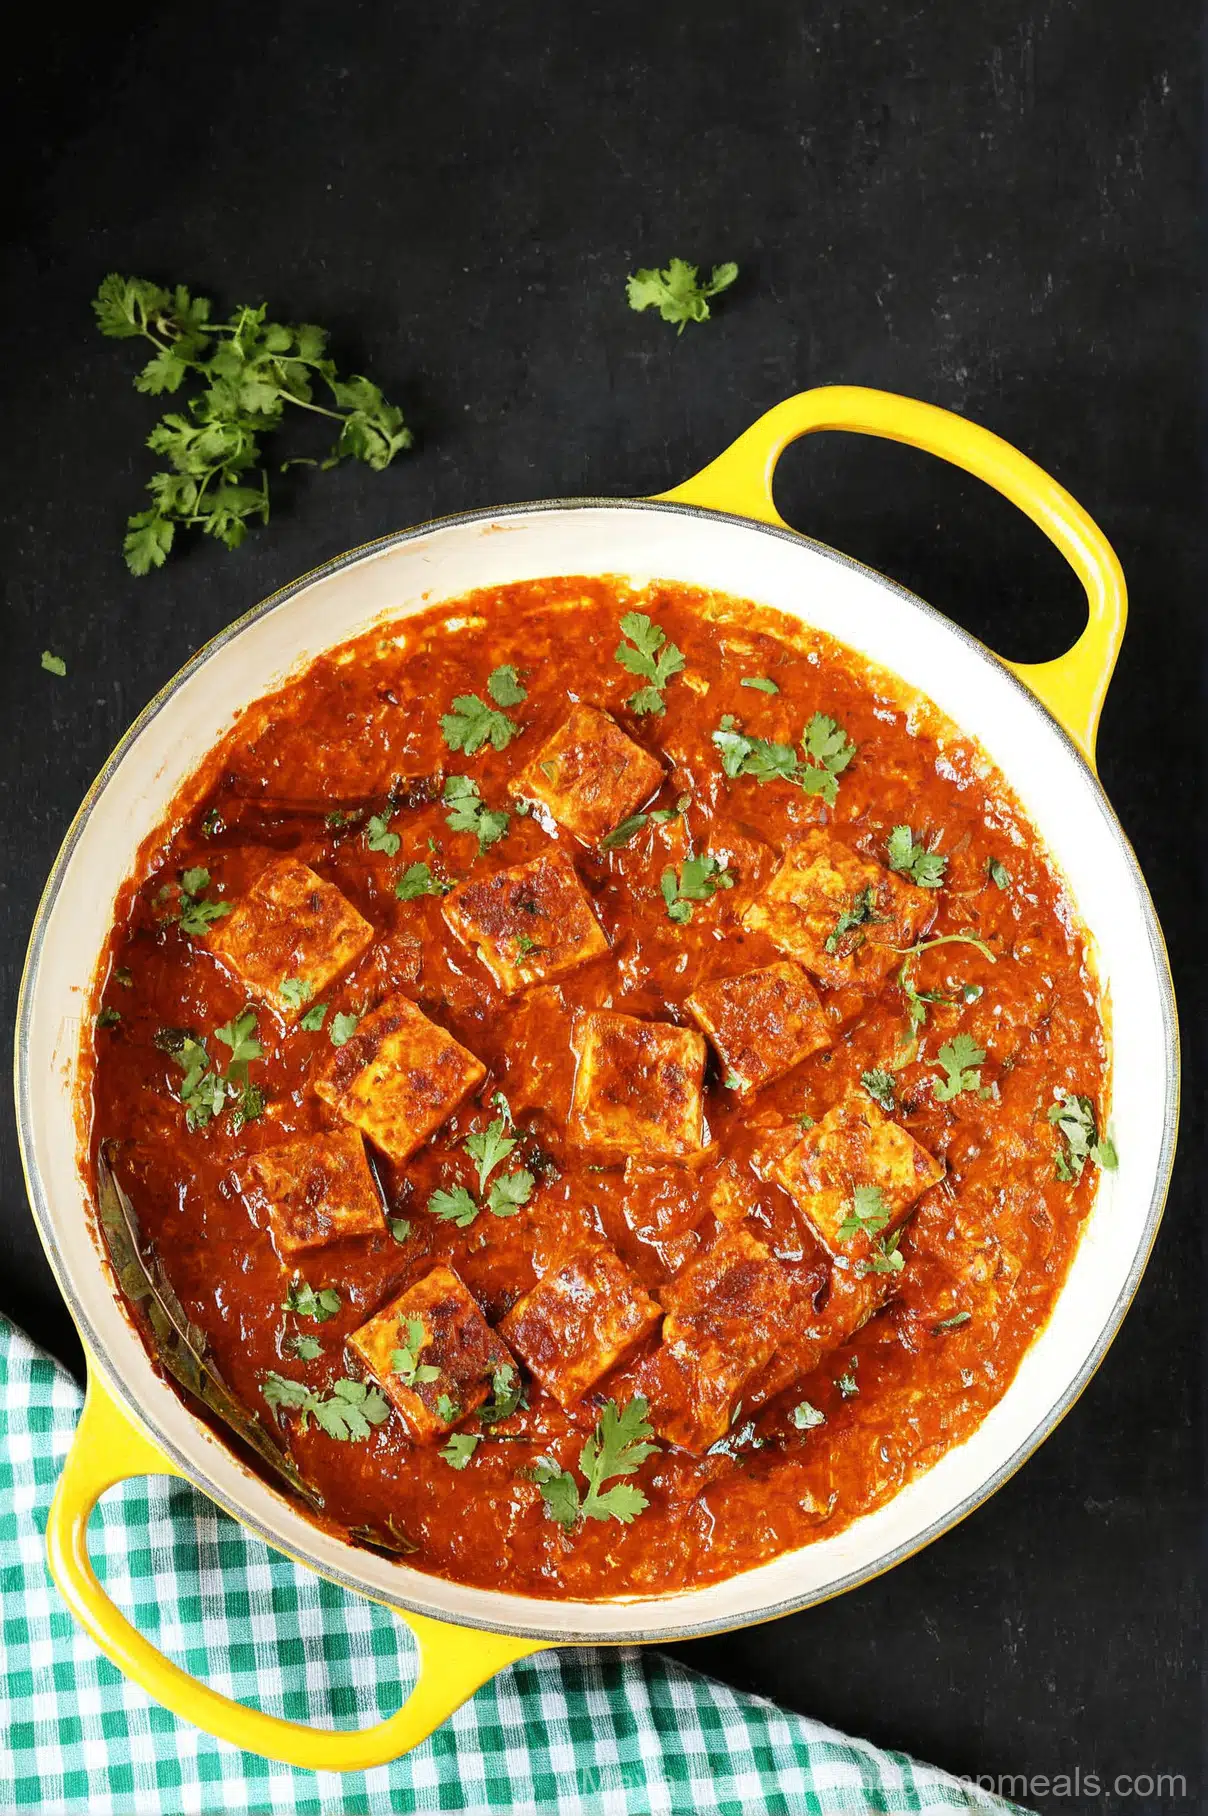
Summary: My first real encounter with paneer happened in a crowded roadside dhaba, tired and hungry during a trip across northern India. I was not yet pregnant, but that memory of tender cheese cubes swimming in a rustic, tomato-onion gravy stayed with me. Years later, when I was pregnant with my first and suddenly craving bold, savory flavors, I taught myself to recreate that dhaba-style paneer curry at home. It is tangy, warmly spiced, and surprisingly simple. Paneer is a calcium and protein powerhouse, completely safe during pregnancy when made with pasteurized milk, and this version uses less oil than traditional recipes while keeping all the authentic character.
Long before I became a mom, before I thought about things like folate and iron and gestational diabetes, I fell in love with a plate of paneer curry on the side of a highway in northern India. I was traveling with a friend, tired and dusty after hours on the road, when we stopped at a dhaba, one of those open-air roadside eateries that serve truck drivers and travelers the most honest, unfussy food I have ever eaten. The cook there, a man who moved with the kind of practiced ease that comes from making the same dishes hundreds of times, brought us a metal thali with steaming rice, a bowl of dal, and a small kadai of paneer curry. The gravy was not smooth and creamy like the restaurant versions I had tried before. It had texture, pieces of grated onion and tomato clinging to the paneer cubes, and a depth of spice that felt warm rather than fiery. I cleaned my plate with a piece of tandoori roti and asked for the recipe. He laughed and said something in Punjabi that my friend translated as, “There is no recipe. Just onion, tomato, and a little patience.”
That memory stayed with me for years. When I was pregnant with my first, my taste buds shifted dramatically. I craved bold, savory, spicy food. I wanted gravies that clung to rice. I wanted the tang of tomatoes and the warmth of cumin. I suddenly remembered that dhaba paneer, and I set out to recreate it in my tiny apartment kitchen. It took a few attempts. My first version was too watery, the second too heavy. But I kept at it, and eventually I landed on a recipe that brought me right back to that roadside table. The texture was right, the spice balance was right, and the paneer, which I had started making at home with pasteurized whole milk, was tender and milky and perfect. I ate that curry over rice for days, my bump pressed against the table, feeling deeply satisfied. It has been in my regular rotation ever since.
Why Paneer Curry Became a Pregnancy Favorite
When I was pregnant, I was always looking for meals that delivered serious nutrition without feeling like health food. Paneer curry was exactly that. The registered dietitian who consults on HomeBumpMeals gave it an enthusiastic thumbs up when I described it to her, and here is why.
- Paneer is a calcium and protein champion. This fresh Indian cheese is made by curdling milk with lemon juice or vinegar, then pressing the curds into a firm block. A single serving of this curry provides a significant amount of protein and calcium, both essential for your baby’s developing bones and teeth. Paneer is completely safe during pregnancy when made with pasteurized milk, which all commercial paneer is. If you make it at home, use pasteurized milk and you are good to go.
- The spice blend supports digestion and reduces inflammation. Ginger, cumin, coriander, turmeric, and garam masala are all known for their digestive benefits. During pregnancy, when digestion can slow down, these spices help keep things moving. The ginger also helps with nausea, which was a constant companion during my first trimester.
- Tomatoes provide vitamin C for iron absorption. The tomato-based gravy delivers vitamin C, which helps your body absorb the iron from the spices and any other iron-rich foods you serve alongside the curry.
- Roasted gram flour thickens the gravy without cream or nuts. Dhaba-style curries traditionally do not use cashews, cream, or butter to achieve richness. Instead, a small amount of roasted besan (gram flour) thickens the gravy and adds a nutty, toasty flavor. It is naturally gluten-free and high in protein and fiber.
- Yogurt adds creaminess and probiotics. A small amount of whisked yogurt stirred into the gravy gives it a subtle tang and richness. Use pasteurized yogurt, and it is perfectly safe during pregnancy. Just make sure your yogurt is not too sour, or it will curdle in the hot gravy.
My dietitian also noted that this dish, when served with rice or roti and a side of vegetables or salad, makes a beautifully balanced meal. The combination of protein, complex carbohydrates, and healthy fats helps keep blood sugar stable and energy up, which was a priority for me when I was managing gestational diabetes.
The Ingredients That Build This Rustic, Flavorful Curry
This recipe relies on pantry staples and a few fresh ingredients. Here is what you need and why each piece matters.
- Paneer: A firm, non-melting Indian cheese that holds its shape beautifully in curries. You can find it in Indian grocery stores, well-stocked supermarkets, or even make it at home. Always check that it is made with pasteurized milk. Cut it into cubes and marinate it briefly in a mixture of spices before adding it to the curry.
- Onions and tomatoes: The foundation of the gravy. In true dhaba style, the onions are finely chopped or grated, not pureed, which gives the curry its characteristic texture. The tomatoes are deseeded and chopped for the same reason. Take your time sautéing the onions until they are golden and beginning to caramelize; this builds the deep, savory flavor.
- Ginger and garlic: Freshly grated or minced. They add a pungent warmth that mellows as the curry cooks.
- Whole spices: Bay leaf, black cardamom, green cardamom, cinnamon, cloves, dried red chilies, and cumin seeds. These are tempered in hot oil at the beginning, releasing their essential oils and perfuming the entire dish.
- Ground spices: Kashmiri red chili powder, coriander powder, roasted cumin powder, and garam masala. Kashmiri chili powder is mild and gives the gravy a beautiful red color without too much heat. You can adjust the amount to your taste.
- Roasted gram flour (besan): This is a signature ingredient in many dhaba dishes. It thickens the gravy and adds a nutty, toasty depth that you cannot achieve with regular flour. Dry roast it in a pan until it smells nutty and turns golden, then cool it before using. If you cannot find it, you can substitute a small amount of nut butter for a similar effect.
- Yogurt or cultured cream: Just a few tablespoons whisked in give the curry a gentle tang and richness. Make sure it is not sour.
- Kasuri methi (dried fenugreek leaves): Crushed between your palms and sprinkled over the paneer marinade and into the gravy, it adds an earthy, slightly nutty aroma that is the hallmark of many North Indian dishes.
- Oil and ghee: The curry is cooked in oil, with an optional spoonful of ghee added for richness. Ghee is clarified butter and is safe during pregnancy because the milk solids have been removed. A tiny bit of ghee is also used to quickly pan-fry the marinated paneer, which brings out the flavors of the spices.
- Fresh coriander leaves: For garnish and a burst of freshness.
The Rhythm of Making Dhaba-Style Paneer Curry
This dish comes together in about 45 minutes, and while there are a few steps, each one is simple and builds on the last. The sequence is forgiving, and you can prep the vegetables while the spices bloom. Here is the flow I follow.
- Marinate the paneer. In a bowl, mix together a little Kashmiri red chili powder, garam masala, salt, and crushed kasuri methi. Add the paneer cubes and toss gently to coat them evenly. Set aside while you make the curry. This brief marinade infuses the paneer with flavor before it even hits the pan.
- Temper the whole spices. Heat oil in a heavy pan. Add the bay leaf, black and green cardamom, cinnamon, cloves, dried red chilies, and cumin seeds. Let them sizzle and pop for a few seconds until they release their aroma. Your kitchen will smell incredible at this point.
- Sauté the onions low and slow. Add the finely chopped onions and cook them on medium-high heat for a few minutes, stirring often. Then reduce the heat and let them cook gently until they turn light brown and begin to caramelize. This step is crucial. Rushed onions will not give you the same depth of flavor.
- Add ginger, garlic, and ground spices. Once the onions are golden, reduce the heat to low. Stir in the grated ginger and garlic, and sauté for a minute until the raw smell disappears. Then add the ground spices, salt, and roasted besan. Stir everything together and let it fry gently for a minute or two, until the spices smell aromatic and the mixture is slightly dry. A spoonful of ghee at this stage adds richness.
- Cook the tomatoes. Add the chopped or grated tomatoes and increase the heat. Cook, stirring occasionally, until the tomatoes break down and the mixture thickens. You will see the oil beginning to separate at the edges.
- Incorporate the yogurt. Take a spoonful of the hot onion-tomato masala and whisk it into the yogurt. This tempers the yogurt and prevents it from curdling. Pour the yogurt mixture back into the pan and stir well. Cook until the masala looks glossy and well blended.
- Add water and simmer. Pour in water and bring the curry to a boil. Cover and let it simmer gently until the onions are completely soft and you see traces of oil on the surface. The gravy should be slightly flowy at this stage, not too thick, because the paneer will absorb some of the liquid.
- Pan-fry the paneer. While the curry simmers, heat a teaspoon of ghee in a small nonstick pan. Add the marinated paneer cubes and fry them gently for just a few minutes, turning them once or twice, until the spices are fragrant and the paneer is lightly golden. Do not over-fry, or the paneer will become tough.
- Add the paneer to the curry and finish. Add the paneer cubes along with any ghee in the pan to the simmering curry. Give it a gentle stir, cover, and cook on low heat for just two minutes. This allows the paneer to absorb the flavors of the gravy while staying soft and tender.
- Garnish and serve. Sprinkle with fresh coriander leaves and serve immediately with steamed rice, jeera rice, roti, naan, or paratha.
Little Tips That Make a Big Difference
- Roast the besan properly. Raw gram flour will give the curry a pasty, unpleasant taste. Dry roast it in a small pan over low heat, stirring constantly, until it turns golden and smells nutty. Let it cool completely before using. You can roast a larger batch and store it in a jar for future use.
- Do not rush the onions. The deep, savory sweetness of properly caramelized onions is the backbone of this curry. Give them time to turn golden brown, stirring occasionally but not obsessively.
- Deseed the tomatoes if you have time. Tomato seeds can make the curry slightly sour. If you are sensitive to acidity, which I was during my first trimester, take a moment to deseed them. You can also peel them if you prefer a smoother texture.
- Use yogurt that is not sour. Sour yogurt can curdle when added to hot gravy. Taste your yogurt before using it, and if it is tangy, use a little less or mix it with a splash of milk to mellow it out.
- Do not over-fry the paneer. A quick sear in ghee is all it needs. Over-frying will make it tough and chewy. The paneer will finish cooking gently in the curry itself.
- Keep the gravy slightly flowy before adding the paneer. Paneer absorbs liquid as it sits, so a curry that looks perfect when you first add the paneer may become too thick after a few minutes. Add an extra splash of water if needed.
- This dish is on the spicier side. If you are making it for young children or you are sensitive to heat during pregnancy, reduce the chili powder and skip the dried red chilies. You can always add more heat at the table.
Variations to Suit Your Kitchen and Cravings
- Matar paneer: Add three-quarters of a cup of frozen peas to the curry along with the paneer for a classic combination.
- Kadai paneer: Use the kadai masala from a traditional kadai paneer recipe and add sliced bell peppers for a different, equally delicious version.
- Tofu swap: If you do not eat dairy or cannot find paneer, use extra-firm tofu instead. Press it well, cube it, and follow the same marination and pan-frying steps.
- Mixed vegetable version: Add cooked potatoes, carrots, and peas in place of or in addition to the paneer for a hearty vegetable curry.
- Richer version: Dhaba food is not meant to be overly rich, but if you want a more indulgent curry, stir in a splash of cream at the end or finish with a knob of butter.
Storage, Freezing, and Meal Prep
Paneer curry keeps well in the refrigerator for up to three days. The flavors deepen as it sits, and I often think it tastes even better on the second day. Reheat it gently on the stove or in the microwave. If the curry has thickened too much, add a splash of water to loosen it. The paneer may firm up slightly, but it will still be tender and delicious. I do not recommend freezing, as paneer can become crumbly when thawed, but the gravy itself freezes well. If you plan to freeze, make the gravy without the paneer and add fresh paneer when you reheat it.
This curry is a wonderful meal to bring to a new mom. Pack the gravy and the pan-fried paneer separately, and include a container of steamed rice or a stack of warm rotis. It is a comforting, protein-rich meal that feels celebratory, and it is a welcome change from the usual casseroles.
A Note on Paneer Safety During Pregnancy
Paneer is made by curdling milk and pressing the curds, and it is completely safe during pregnancy when made with pasteurized milk. All commercially produced paneer in the United States, Canada, and most countries is pasteurized. If you are making paneer at home, use pasteurized milk and you can enjoy it without any worry. Paneer is a wonderful source of calcium and protein, and it is one of the gentlest cheeses on the stomach. I ate it regularly during both my pregnancies, and it was a staple during the postpartum weeks when I needed extra calories for breastfeeding. For a complete breakdown of which cheeses are safe during pregnancy and how to read labels, my full guide is here: The Complete Guide to Eating Cheese During Pregnancy.
Maya’s Mom Confession: The Dhaba Memory That Became My Kitchen Comfort
I will never forget sitting at that dhaba in northern India, the sun setting over the highway, the metal thali warm under my fingers. The cook did not speak my language, but he smiled when he saw me scrape the last of the gravy from the kadai with a piece of roti. That meal was simple and unpretentious, made with the kind of confidence that comes from knowing a dish by heart. When I finally figured out how to make it at home, years later and very pregnant, I felt like I had unlocked something important. It was not just a recipe. It was a connection to a memory, to a place, to the idea that good food does not need cream or cashews or fancy techniques. It just needs good ingredients and a little patience.
Now, when I make this dhaba-style paneer curry, my kitchen fills with the smell of cumin and caramelized onions, and I am transported back to that roadside table. My toddler picks out the paneer cubes and eats them with her fingers. My baby is not quite ready for spice, but she will be soon. And I sit down with my bowl of curry and rice, grateful for a meal that has traveled so far to be here with me. If you are pregnant, nursing, or just looking for a dinner that feels like a warm welcome, I hope you make this paneer curry. It might just become one of your kitchen memories, too.
The full recipe card with exact measurements, step-by-step instructions, and all my tips is right below. Go chop some onions, and let the spices do their work.