Aussie Meat Pie Recipe

By Maya Hart
⬇️ Jump to Recipe
🥄 Prep: 40 mins 🔥 Cook: 220 mins ⏱️ Total: 260 mins 🍽️ Yield: 6 servings ⚡ 825 cal

The Four Hour Weekend Project

I am going to be brutally honest with you right out of the gate. You do not make these Aussie meat pies on a random Wednesday when you are surviving on cold coffee and sheer willpower. The total time on this recipe card says 260 minutes. That is over four hours of your life. If you attempt this from start to finish while a toddler is clinging to your leg and the baby is screaming, you will end up crying in the pantry.

But here is the beautiful thing. When you actually have a free Saturday afternoon, or when your partner is home and wrangling the kids, making these pies is pure therapy. The house smells like a legendary bakery. You are braising beef chuck for nearly two hours until it literally falls apart when you look at it. Then you are wrapping that glorious, rich meat in a buttery shortcrust base and a flaky puff pastry lid.

Pro tip from my tiny kitchen. Make the beef filling on a Sunday. Let it cool, put it in the fridge, and just assemble and bake the pies on a Tuesday. It cuts your active cooking time in half and actually makes the filling taste infinitely better after it sits overnight.

Let us look at the heavy lifting

We need to talk about the nutrition label because this is not a delicate little appetizer. One single pie is 825 calories. It has 46 grams of protein and 41 grams of fat. When I was navigating my gestational diabetes, I had to be very strategic about meals this heavy. The massive amount of protein from the beef and the fat from the pastry do a fantastic job of keeping your blood sugar completely stable. You will not get a spike, and you definitely will not be hungry again for at least six hours.

Just be aware that it is a very rich, very dense meal. If you are eating this alongside a mountain of mashed potatoes and gravy, you are looking at a massive food coma. I usually serve mine with a sharp green salad to cut through the richness. The acid from a simple vinaigrette balances out the heavy, savory meat perfectly.

The golden rule of pastry

Do not skip the step where you let the filling cool completely before putting it in the pastry. If you put hot meat into raw pastry, the bottom turns into a soggy, sad mess. We worked way too hard for that flaky crust to ruin it at the finish line. Let it cool in the fridge. Pour yourself a glass of wine.

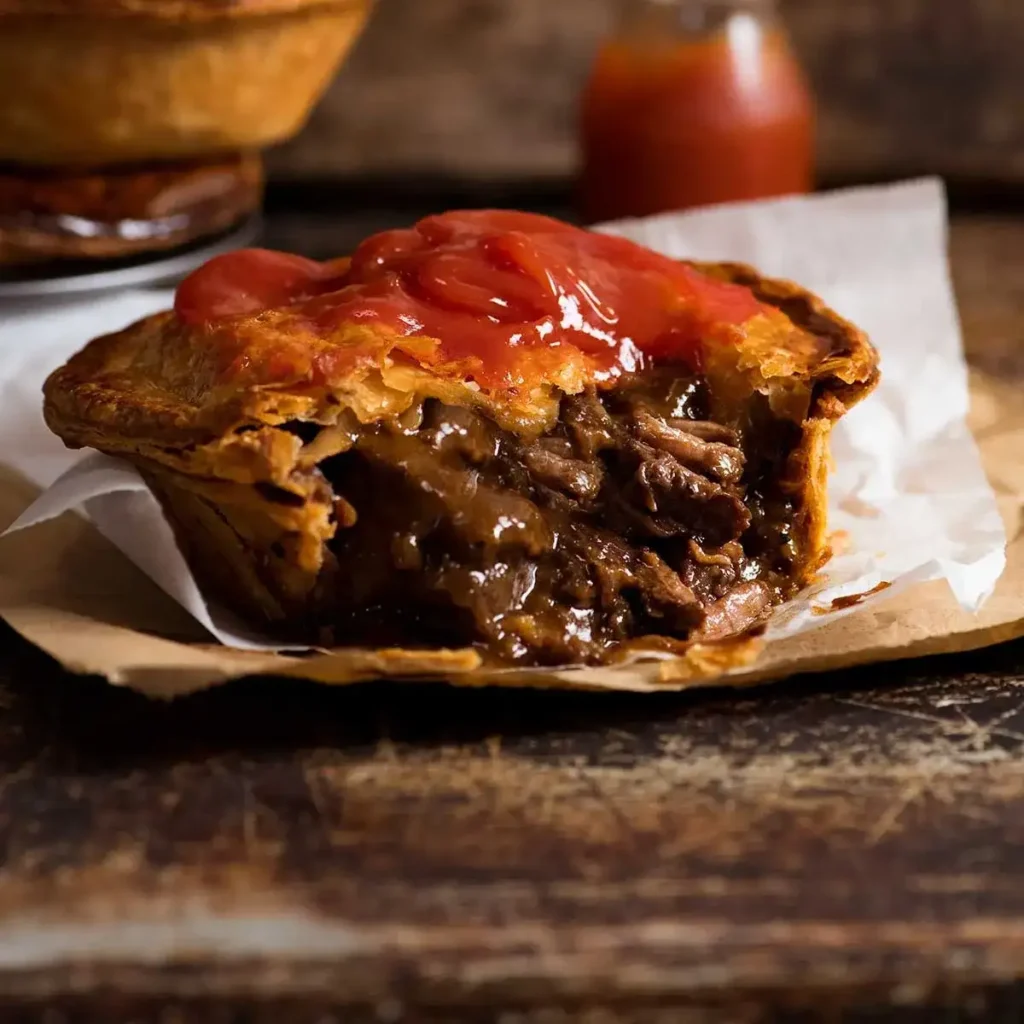
When you finally pull them out of the oven and see that deeply golden, puffed pastry, you will feel like an absolute genius. Add a squirt of ketchup, take a bite, and enjoy every single glorious, messy second. You earned this.
Aussie Meat Pie Recipe

🩺 Reviewed on July 9, 2026 by: Cassandra Stockwell, MS, RDN, LDN, IBCLC
🥄 Prep: 40 mins 🔥 Cook: 220 mins ⏱️ Total: 260 mins 🍽️ Yield: 6 servings ⚡ 825 cal

🥫 Ingredients

For the filling:
1.25 kg (2.5 lb) beef chuck, cut into 2.5 cm (1-inch) cubes
½ teaspoon each salt and freshly ground black pepper
2–3 tablespoons olive oil
1 medium onion, finely diced
4 garlic cloves, minced
5 tablespoons plain (all-purpose) flour
1¼ cups (315 ml) low-sodium beef stock
2 tablespoons tomato paste
1 teaspoon Worcestershire sauce
2 teaspoons coarsely ground black pepper
2 dried bay leaves
For the pastry:
1½ batches homemade shortcrust pastry, or
3 sheets frozen shortcrust pastry, thawed (approx. 300 g / 10 oz total), or
2 chilled ready-rolled pie crusts
3 sheets frozen puff pastry, just thawed (approx. 300 g / 10 oz total)
1 large egg, lightly beaten with a pinch of salt (for egg wash)

📝 Instructions

Make the filling:
  1. Season the beef. Toss the cubed chuck with the ½ teaspoon each of salt and pepper until evenly coated.
  2. Brown in batches. Warm 1 tablespoon of oil in a large, heavy-based pot over high heat. Add a third of the beef, spreading the pieces out so they sear rather than steam. Brown aggressively on all sides, then remove to a plate. Repeat with the remaining meat, adding extra oil as needed.
  3. Soften the aromatics. Reduce the heat to medium-high. Add the onion and garlic to the empty pot and cook, stirring often, for about 3 minutes until softened and translucent.
  4. Thicken with flour. Sprinkle the flour over the onion mixture and stir constantly for 1 minute to cook out the raw taste.
  5. Build the braising liquid. While stirring steadily, slowly pour in the beef stock, working out any lumps. Once the flour is fully incorporated, tomato paste, Worcestershire sauce, coarsely ground pepper, and bay leaves. Stir well.
  6. Braise until tender. Return the browned beef and any accumulated juices to the pot. Bring the liquid to a gentle simmer, then cover with a lid. Adjust the heat to maintain a low, steady bubble and cook for 1 hour 45 minutes (105 minutes). Remove the lid, raise the heat slightly, and continue to simmer uncovered for another 30–45 minutes, stirring now and then, until the beef can be pulled apart with a fork and the sauce has reduced to a thick, glossy gravy that just barely covers the meat. Remember the sauce will thicken further as it cools and inside the pie.
  7. Cool completely. Take the pot off the heat, cover, and let the filling cool entirely. For best results, refrigerate overnight; this deepens the flavour and makes the pies much easier to assemble.
Prepare the pastry cases:
  1. Preheat and cut the shortcrust. When ready to bake, preheat the oven to 180°C (350°F). Using a cutter or small plate as a guide, cut 6 rounds from the shortcrust pastry that are large enough to line your individual pie tins with some overhang.
  2. Line the tins. Gently ease the pastry rounds into the tins, pressing them into the corners without stretching the dough (stretching causes shrinkage during baking). Place the lined tins on a baking tray for stability.
  3. Blind bake. Lay a large square of baking parchment over each pie shell and fill with pie weights, dried beans, or rice. Bake for 20 minutes. Carefully grasp the paper overhang and lift out the weights, then return the crusts to the oven for another 5 minutes, or until the bases are a light golden brown and feel dry to the touch. Remove from the oven and set aside.
Assemble and bake:
  1. Fill the pies. Spoon the cooled beef mixture into the pre-baked shortcrust shells, pressing it down gently so there are no air pockets. The filling should mound just slightly in the centre.
  2. Cut the puff pastry lids. From the partially thawed puff pastry sheets, cut 6 rounds that are slightly larger than the top edge of your pie tins.
  3. Seal and vent. Brush the rim of each shortcrust case with a little of the beaten egg. Lay a puff pastry lid over the filling and press the edges firmly to seal the lid to the base. Brush the tops generously with more egg wash, then use a small knife to cut a 1 cm (½-inch) slit in the centre of each pie to let steam escape.
  4. Bake to golden perfection. Place the pies back on the baking tray and bake for approximately 30 minutes, or until the pastry is deeply golden, puffed, and crisp.
  5. Serve immediately. Devour the pies piping hot, with a squirt of tomato sauce (ketchup) if you like.

🔬 Nutrition Facts

Serving Size: 1 serving | Calories: 825 kcal | Carbohydrate Content: 43 g | Protein Content: 46 g | Fat Content: 41 g | Saturated Fat Content: 14 g | Cholesterol Content: 165 mg | Sodium Content: 759 mg | Sugar Content: 2 g
Medical Disclaimer: This content is for informational purposes only and does not replace professional medical advice, diagnosis, or treatment. Always consult your OB-GYN, midwife, or a registered dietitian for personalized guidance tailored to your health history. I am a mom who figured this out the hard way, not your doctor!🔬 Researched using established prenatal nutrition guidelines

About the author – Maya Hart

I’m a mom of two and the founder of HomeBumpMeals. After a surprise gestational diabetes diagnosis, I turned my tiny kitchen into a test lab for easy, nourishing meals. Every recipe is researched using established prenatal nutrition guidelines (like ACOG & ADA) and battle-tested in the chaos of real life.

📚 Researched via ACOG & ADA Guidelines 🤰 Tested by a Real Mom 📸 What You See Is What I Made
Read Maya’s full story →

💬 Share your thoughts

Your email address will not be published. Required fields are marked *